
There are many posts dotted around the interweb detailing how best to use the cloud with Wordpress, but so far all I’ve found have been tutorials on how to offload your uploaded resources or theme files, instead of actually serving your entire site through a Content Delivery Network (CDN).
This post is an attempt to move the conversation in a slightly different direction.
The Why
Knowing how to shift your resources off to S3 and have them CloudFront’d is all well and good, but if your site gets hit by a huge spike in traffic, no amount of resource-offloading will help you - your site itself just won’t be able to keep up with the demand.
Formally moving your entire frontend off to a CDN is a great way to cheaply host your site without having to worry about incoming traffic that may end up hammering your server(s).
So, with that in mind, on to the tech!
The Cloud
- Amazon CloudFront - Amazon’s CDN, which at the time of writing has edge nodes (caching servers) in 51 locations, covering the United States (20), Europe (16), Asia (12), Australia (1) and South America (2)
- Route53 - Amazon’s DNS management for domains
- Amazon S3 - Storage of uploaded content
The Post
And so, on to the meat of the matter.
Given a blog that already exists on http://www.domain.com, lets make it web-scale.
1: Setup Route53
WARNING: Making any sort of change to your DNS records can result in your site going offline for quite some time. Do not do this if you don’t know exactly what it is you’re doing.
Moving your DNS to Route53, while not explicitly required, will allow you much more control over how you manage your DNS with regard to CloudFront.
The ability, in particular, to “alias” your domain APEX (ie: http://domain.com) to a specific CloudFront distribution is incredibly useful, as it allows you to use CloudFront to cache redirect commands instead of having to hit your actual webserver for every non-CloudFront request.
- Follow the official Amazon docs on migrating an existing domain to Route53 to carry this out, if you decide to move to Route53
2: Add your origins to Route53
Now that you have your DNS running on Route53, and your CloudFront distributions are setup to listen for http://www.domain.com (distribution 1) and http://domain.com (distribution 2), we need to make sure that the origins that both distributions are getting their content from are setup too.
- Add a new DNS A record for
origin.domain.com, and point it to your actual Wordpress server - Add a new DNS CNAME record
redirect.origin.domain.comand point it toorigin.domain.com - Add a new DNS CNAME record
admin.domain.comand point it toorigin.domain.com
3: Configure your web server
If you’re using nginx, this config should work (or at least give you a headstart) to configure your server for requests coming from CloudFront:
#redirection vhost
server
{
  listen 80 default_server;
  server_name domain.com redirect.origin.domain.com;

# This doesn't actually matter - as *all* requests are being redirected anyway
  root  /var/www/sites/wordpress;

  location /
  {
    rewrite ^ http://www.domain.com$request_uri permanent;
  }
}

#wordpress vhost
server
{
  listen       80;

  server_name  www.domain.com origin.domain.com admin.domain.com;

  root  /var/www/sites/wordpress;

  access_log  /var/log/nginx/wp.access.log;
  error_log   /var/log/nginx/wp.error.log;

  index index.php index.html;

  location /
  {
    expires off;
    try_files $uri $uri/ /index.php?$query_string;
  }

  #matches .php files
  location ~* \.php$
  {
    expires off;

    fastcgi_pass   127.0.0.1:9000;
    fastcgi_index  index.php;
    include        fastcgi_params;

    fastcgi_param SCRIPT_FILENAME $document_root$fastcgi_script_name;
  }
}
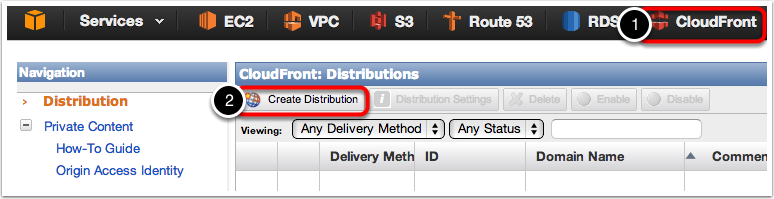
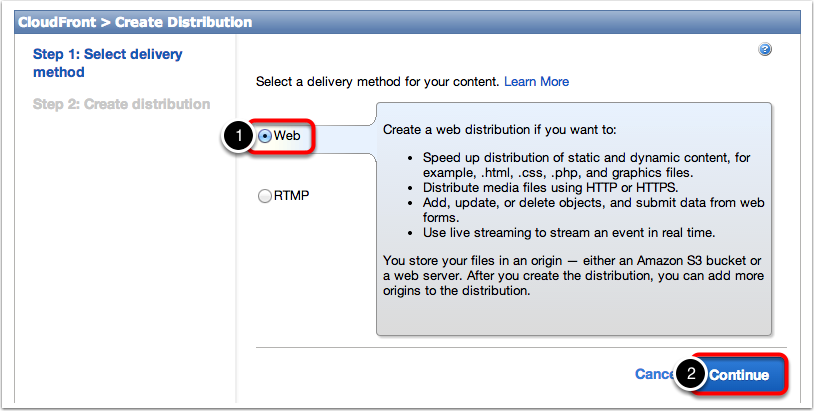
4: Setup CloudFront
The next thing you need to do is sign up for CloudFront.
CloudFront operates using “distributions”, which can have multiple domains associated with them.
Along with having multiple domains, each distribution can also have 1 or more “origin servers” - and these are where CloudFront actually gets the content for your website from, so that it can cache it and present it to your users.
CloudFront explained
- When a visitor hits
http://www.domain.com, they will no longer be hitting your webserver, and will actually be reaching a CloudFront Edge Node. This node will (usually) be the closest node to them, geographically.- This edge node will compare the domain name (
www.domain.com) and look at its list of distributions for a match. - Distributions can also accept
httprequests - but as mentioned below, this will be covered in another blog post
- This edge node will compare the domain name (
- Providing a match is found:
- If this node has a cache of the page the visitor has requested, it will immediately return this cached content to the user.
- If, however, this particular edge location has no cache yet, CloudFront will establish a new connection, internally, to whatever “origin server” you have configured for the current distribution, and will mimic the request that came from the visitor.
- Once a response is provided to the edge node, by your “origin server”, the node will then cache it for future requests to that URL
- Now that the edge node definitely has a cached version of the page (or resource like Javascript, image or CSS file) requested, it will return this content to the visitor - even if that cache is a 404, or error page.
Important: Distributions will cache everything that they return to a visitor. For this reason, you need to carefully consider your CloudFront distribution setup - and do not use just 1 distribution.
If you use only 1 distribution, your users could experience infinite redirects, that you can’t solve all that quickly. This is because CloudFront distributions will cache the first thing they receive from your origin server:
Good behaviour, with only 1 distribution
- User visits
http://www.domain.com- No cache exists for this page in the distribution
- The distribution goes to your origin server for the page requested by the user
- The distribution will cache the content of the page, and deliver that page to the user
- A different user then visits
http://domain.com, and receives the content that exists in the cache for that distribution.
Bad behaviour, with only 1 distribution
- User visits
http://domain.com- No cache exists for this page in the distribution
- The distribution goes to your origin server for the page requested by the user
- Distribution is told to redirect users to
http://www.domain.com - This redirect is cached, and passed on to the user
- The user’s browser follows this redirect, and visits
http://www.domain.com - The distribution has already cached a redirect command for this URL
- User is redirected to
http://www.domain.com - User is now in an infinite redirect loop
The reasoning behind this, is that distributions cache each request, regardless of requested domain.
The only way around this at the moment (Feb 2014), is to use a second distribution. This way, when a user visits http://domain.com, every request is redirected to http://www.domain.com by the redirection distribution.
Every request to http://www.domain.com will reach a different distribution, which won’t know about the redirection, meaning that your site will operate normally.
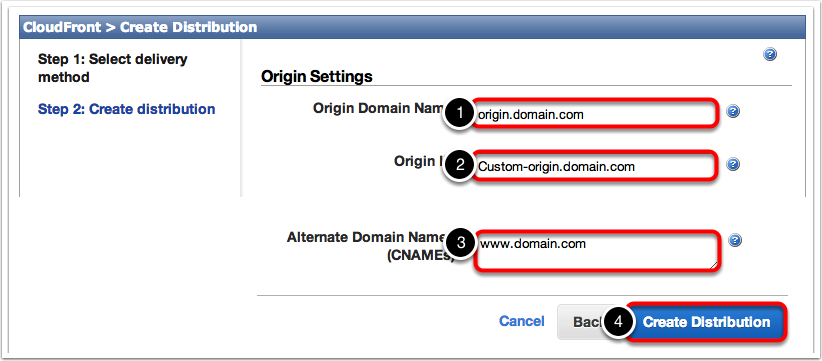
With this in mind, you’ll need to create 2 CloudFront distributions for your site.
The first will be for your Wordpress origin - this will be what actually responds with a Wordpress site to your visitors:
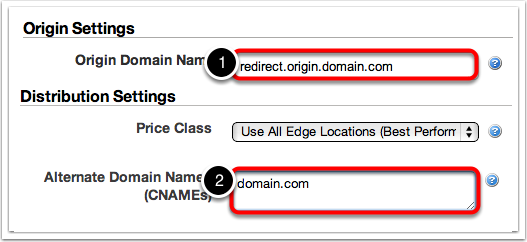
The second distribution, which will be used only for redirection purposes should look something like this:
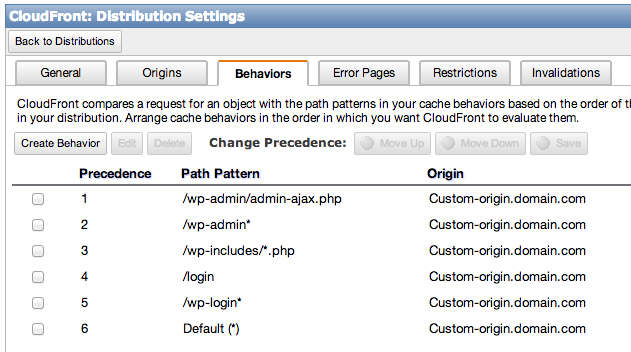
5: Lockdown wp-admin and wp-login.php
CloudFront gives us some basic access control settings that we can use to prevent anyone from logging in to your Wordpress install, or from trying to access your admin control panel.
This, natually, will also restrict you from the same interfaces, but we’ve got that covered by using admin.domain.com, which is explained a little further on.
6: Wordpress changes
Wordpress itself has proven to be quite troublesome to shoehorn into this particular solution.
As Wordpress presumes that it is running on the domain that it is publically available on, and as it also insists on hardcoding the entire url of resources on every page response, we need to fool it into thinking it’s running on a different domain when we want to add a new post, or login, but to know that it should also be running on the main domain of http://www.domain.com for every other request.
So, to do this, we modify the Wordpress config.php file:
define ('C_DOMAIN', 'www.domain.com');

$proto = 'http://';
$site_domain = C_DOMAIN;

//Check to see if the domain is the admin domain, AND the IP address is our home/office IP
//**NOTE** Change the IP address (169.254.0.10) below to match your external ip address ... otherwise you won't be able to login to your wordpress installation
if ($_SERVER['HTTP_HOST'] == 'admin.domain.com' && $_SERVER['HTTP_X_FORWARDED_FOR'] == '169.254.0.10') {
  $site_url = $proto . $_SERVER['HTTP_HOST'];
} else {
  $_SERVER['HTTP_HOST'] = $site_domain;
  $site_url = $proto . $site_domain;
}

define( 'WP_CONTENT_URL', $proto . $site_domain . '/wp-content' );
define ('WP_HOME', $site_url);
define ('WP_SITEURL', $site_url);
This small change will allow us to run the same Wordpress installation on multiple domains, without worrying about Google caching the wrong thing. It also gives a tiny measure of protection against hack attempts, by restricting access to a given IP address. (which can also be done in the nginx config if you’d rather)
Adding new content/posts
Now that your Wordpress installation is running entirely behind a CDN, you can no longer sign in to http://www.domain.com/wp-login.php
Obviously, you’ll need to be able to add new posts, but we’ve already taken care of that: simply browse to http://admin.domain.com/wp-login.php, and off you go!
Clearly, this added level of security isn’t actually security, but it does allow you to easily view your site without the abstraction of a caching proxy in between your requests. You should be free to navigate your site as normal, using the admin.domain.com subdomain… just remember that you can’t link anyone to this domain, as you’ve locked it down by IP address.
To share your posts, you’ll always need to be careful, making sure that you share www.domain.com instead.
The Limitations
Logins/User Accounts
This approach effectively makes your site read-only for non-admin users. As mentioned earlier, this isn’t a problem for corporate or brochure-related sites … but may not be particularly suitable for those who run communities, or forums.
Content Cache Expiry
By default, CloudFront will cache anything it serves (content or resources … which could be anything from images, css or javascript files, to zip archives or anything else) for 24 hours.
This detail means that, if you update a typo on a post, it won’t be visiable to the whole world for 24 hours. Even if you can see the correct version by visiting http://www.domain.com/hello-world, there’s no way to know for certain what users in other geographical regions are seeing, without having someone in those regions to let you know.
This also applies to pages that list your new blogs, like your homepage or archives pages.
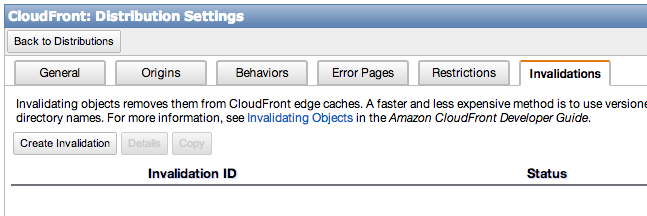
There is, of course, a way around this - you can force the cache to clear.
Unfortunately, cache-expiry isn’t something that you can just do for your entire domain. CloudFront requires that you explicitly tell it exactly what URLs to expire for you. That’s where this plugin comes in: List All URLs
Using it, you can output a full list of every page and post that you have in your wordpress install. If you want to, you can invalidate all of these, but there’s really no need to, if you’ve only updated 1 or 2 pages, so lets just invalidate the home page (/), “Hello World” (/hello-world), and a CSS file:
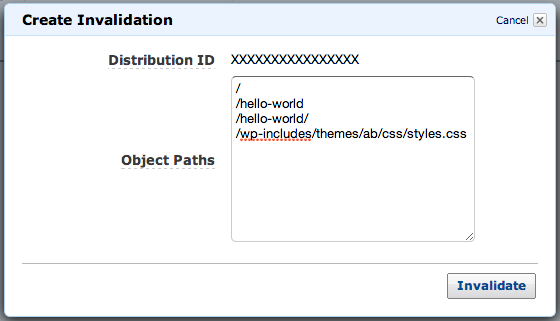
The process usually takes me around 10 minutes to complete, but has taken as long as 2 hours. Be patient - once you’ve started this, you can trust that it will complete. And either way, it will clear itself out in 24 hours, if something goes wrong.
It’s worth noting the doubling-up of some of the URLs there, like /hello-world and /hello-world/. Depending on your setup, you may be auto-redirecting to/from these URLs for your posts. If you’re auto-redirecting to one ‘real’ page, then you only need to clear the cache for that individual one. The redirect will continue to operate as normal.
One final note here is the example above of styles.css - whenever you change your resources, these too will need to be invalidated if you want the newer versions of them to be delivered to your users. This goes for JavaScript, CSS, images, file downloads … any resource at all. If you don’t do this, then the older version of the file may be served to some of your users.
Comments
Given the fact that all of our CMS processing is now being done once and once only, per page, we can’t rely on Wordpress’ commenting to allow users to post on our content.
If you really want or need commenting, then you should look into a client-based solution like Facebook Comments or Disqus.
This is an important consideration to make, as if you absolutely require Wordpress comments, then it may not be reasonable to make this massive move to a CDN hosted blog in the first place.
Coming Next Time
Next time, I’ll detail how to go about including SSL certs on custom domains.
Until then,
Dan